|
I purchased two Big Green Egg’s (large and small)
and just had them sitting on my patio. I thought quite a
bit about what I wanted as an end product and will have to admit I somewhat went overboard a bit. I'll have to admit though it was fun to design and build and I
really enjoy working with it. I'm an optometrist by profession,
but a design engineer at heart I suppose. I'm always tinkering
with things to “make them better” (and yes, I do that with all my office equipment as well). Sometimes it doesn’t work out of course. Anyone else who has a tendency to do the same thing knows what I
mean. To build something like this yourself, you have to know
some basic carpentry and have some knowledge of building materials, etc.
I originally planned to make the internal structure
out of 2” square steel tubing (1/8"wall) and have it welded and painted by a shop here in my city
that I have used before. However, I decided to do a sort of “mock-up”
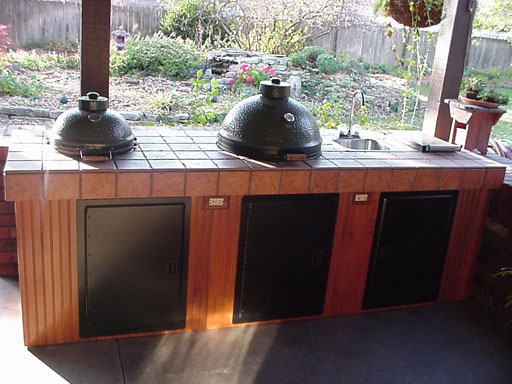
of my Egg Center out of old 2 x 4’s I had around. It is
roughly 8½’ long by 30” deep. It is 32” tall. By the time I finished screwing and bolting together the frame, I
decided the wood frame was "good enough" and I didn’t need to do the steel tubing. I then had some 2” angle iron cut. I spray painted them
black with automotive paint so they wouldn’t rust. I bolted
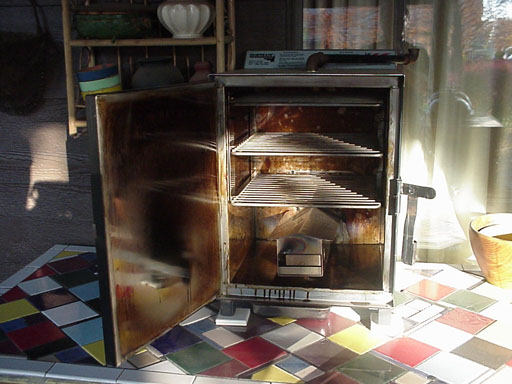
these angle irons width wise and girth wise onto the bottoms of the frame and mounted 8 heavy duty 2”
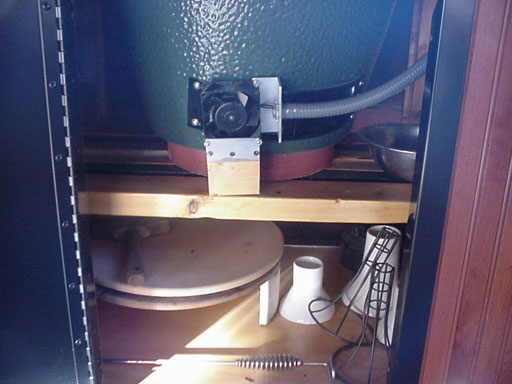
casters, on the ends of the angle irons, so the unit could be rolled around. I also had some angle irons for the shelves to set the eggs on.
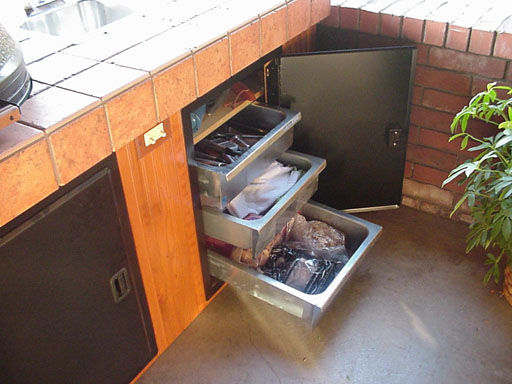
Hopefully you can visualize this from the photos with the doors open.
The height of the frame with the casters at this point was about 30”. I bolted some short 2 x 4’s on top of the bottom angle irons and
mounted the lower shelf to those so that the bottom of the lower shelf was roughly an inch off the ground. There are some small cut-outs for the casters.
I covered the frame sides, front and top with ¾”
outdoor plywood and sealed it with outdoor type polyurethane (sometimes called “spar” polyurethane). I also coated the 2 x 4” frame twice with a sanding in between to
smooth the wood so as to cut down on dust accumulation. I did
not cover the rear ... my unit is backed up against the low brick wall around my patio. I get good ventilation that way.
I then covered the top with ½” concrete tile
underlayment. I also screwed 2 x 4’s all around the upper rim
of the cabinet and covered those with tile underlayment as well. I
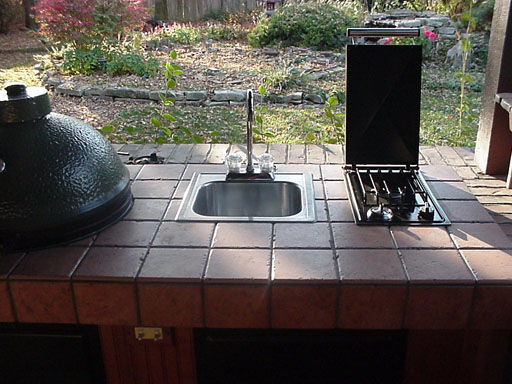
then covered the top and rims with nice outdoor type tile (actually floor tile). The tricky part of this was to figure out exactly where I wanted to
place the eggs, sink and gas burner so I could cut the large round circles out that they would fit into. I laid out the tiles that would be in the area of the circles and marked them first. I then went to the tile store and asked them to rough-cut the
circular shapes out as best they could with their diamond cutter. Heavy
duty or floor tile is very difficult to cut smooth. After they rough cut it I smoothed them down even
more with my huge belt sander with the lowest # grit sanding belts I could get. This was a tough job and took a long time. I had numbered all the tiles initially so they would all fit properly.
Once I finished the tiles and they were fully grouted and cured for a couple of days, I still had
some tiles that needed more grinding or smoothing. I
found that I could use my hand belt sander (the rounded front end) with the coarsest grit belts I could find
and actually do a better job than I did with my bigger shop unit. I then sealed the grout with a couple
coats of silicone grout sealer.
I wanted a wood appearance for the outside of the
unit and wanted something that would tend not to rot, being outdoors all the time. I looked at various patterns in 4 x 8 sheets of plywood, outdoor
paneling, etc. but did not really find anything that I felt was satisfactory.
I ended up purchasing individual 3” tongue and groove boards made out of redwood. We have several small companies here that do custom work of that
kind. I mounted the boards and finished them off with a light
stain and a couple of coats of the outdoor heavy-duty polyurethane. They
come to about ¼" off the floor of the patio so you can't even see the castors. Voilá.
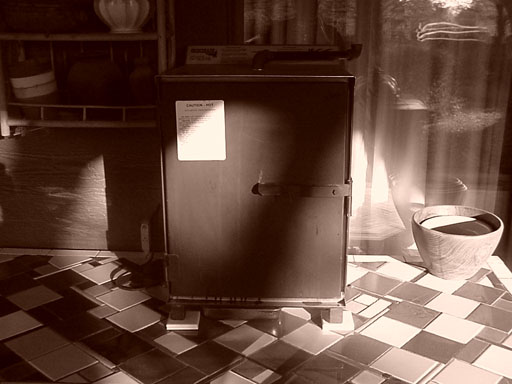
Now on to cutting the openings for the doors and
mounting the eggs, sink and gas burner. I ordered my doors from
someplace on the internet and I can’t remember where now. I
know I ordered the gas burner top from the same place. It may
have been http://www.thegrillstoreandmore.com/island-access-doors.asp
but I don’t remember them being as expensive as shown so I must have gotten them elsewhere. They are similar to the Fire Magic brand. Mine are painted black and the door frames are 20” x 27”. The actual doors are 17” x 24”.
These are just about the same as access type doors for electrical boxes, etc., so I suspect a person
could do an internet search for those and have them painted black at an auto body shop a lot cheaper. I purchased stainless steel drawers for the right hand side of the
unit from a local restaurant supply house and jury-rigged my own sliders, etc. They seal pretty well
when they are closed in an attempt to keep out insects, etc. I
currently keep my utensils in the top drawer, some wood chunks in one and cloth towels and things in the
other one. Since I have begun to use Trex’s steak cooking
method I have considered converting one of the drawers to a “resting” drawer.
I already had a garden hose hookup and gas hookup on
the other side of the brick wall surrounding the patio and there was a hole at the bottom of the brick wall
for drainage. I ran the gas line, water line and electrical
conduit through that hole and into the back of the unit to hook everything up. I then ran a water drain line from the sink back out through that hole into a small “dry well”. I actually don’t run that much water through it so it usually just
waters the bushes there anyway. Everything coming out and going
in there is hidden by bushes.
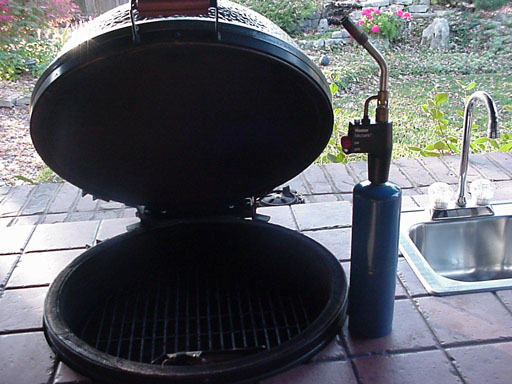
Oh, by the way, there is about a ¼” to ½” of
open space between the circular top openings and the eggs. You must have room for the heat to escape. When you open
and close the eggs you get some rocking motion, so I purchased some high temperature (black) automotive
silicone from an auto parts store and tacked a bit here and there around the insides of the openings to
cushion the eggs, yet allow heat to flow out.
Worked great!
I also hooked up small 120 volt computer type fans
from a surplus shop so that I could move them easily into position for starting charcoal more quickly. After my temps get up to about 700° or 800° I switch the fan off. I also have now purchased a small shop-vac that sits underneath the
small egg and is wired in so that I can easily vacuum up coals, dust, etc.
I use nothing but a MAPP torch for lighting my lumps.
THINGS I WOULD HAVE DONE DIFFERENTLY.
Yes, there are always, always, things one would do
differently. I would have gone back to my original plan with
the welded square tubular steel frame. The structure would have
ended up actually being lighter in weight. Even with the heavy
duty casters, this structure is HEAVY. I would never be able to
move it to another home. It will have to stay here, I’m
afraid. I can barely even roll it out to clean behind it. I always tend to overbuild everything I do and I would want to cut
way back on that. I would use ½” or ¼” plywood and only
¼” tile underlayment, or possibly just ½” plywood with no underlayment as long as the top is braced
well enough not to flex. I would have the unit only 30” tall
and have the eggs sitting up a little higher out of the unit to make room for the newer spring type bands
for the eggs.
I would also eliminate the gas burner. It is nice to have but I have never used it in 2+ years. I would probably prefer to have a restaurant style stainless “food keeper”. One
of those with the sliding top like a roll-top desk. I’m sure
they probably have those at restaurant supply houses. It is annoying to have flies and insects around in the summertime and one needs to keep everything
covered up. As far as the gas grill, one can always use
portable electric grills, electric skillets, etc. if needed. I
often like plugging in a deep fat fryer. Since I have two eggs,
I currently use one of them to keep food items covered. I also
keep a fan going in the area in the summertime to cool down and try “breezing” the insects away.
|